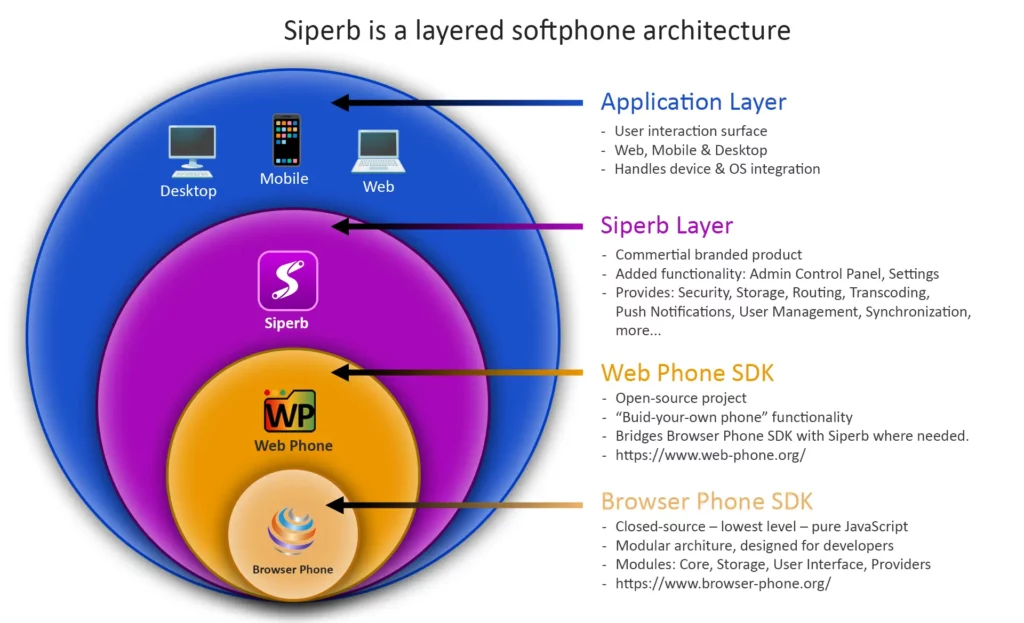
The Web-Phone project by Siperb is an open-source, WebRTC-powered softphone and SIP proxy designed to bridge browser clients with traditional VoIP infrastructure such as Asterisk, FreeSWITCH, or any SIP-based PBX. It includes provisioning tools, device/session management, and examples for integrating with SIP.js, JsSIP, or custom clients, enabling secure and scalable real-time communication in web and mobile applications. This documentation provides detailed guides, API references, and implementation patterns to help developers embed, customize, and extend browser-based WebRTC calling with confidence.

Web Phone — Getting Started
Web Phone is an open-source WebRTC / VoIP Web Phone SDK designed for embedded softphones (CRMs, SaaS apps, portals). It helps you bootstrap a SIP client (SIP.js, JsSIP, or your own) by handling a consistent provisioning flow and returning the SIP/WSS details you need.
What you need first
Browser + hosting requirements
- A modern browser with WebRTC support.
- Your web app should be served over HTTPS (required for mic permissions in most browsers).
Decide how you’ll use Web Phone
It’s up to you, how you want to integrate. If you have your own phone code, from something like SIP.js, JsSIP, SIPml or even your own code, or you want to use our full stack, go ahead, select from the options below:
-
Manual credentials (no provisioning) and not using the Siperb Proxy -> Use our Web Phone SDK to:
- Load Browser Phone SDK client. Select this option (Note: SIP credentials will be in the browser source code)
- Load your own SIP.js/JsSIP/custom client directly with your PBX details. Select this option (Note: We are not really providing anything in this case.)
-
Using Siperb Provisioning but not using the Siperb Proxy -> Use our Web Phone SDK to:
- Login + fetch device provisioning, then initialize SIP.js/JsSIP/custom client from that provisioning (connecting directly to your own PBX). Select this option (Note: SIP credentials will be in the browser source code)
- Login + fetch device provisioning, then initialize Browser Phone SDK client from that provisioning (connecting directly to your own PBX). Select this option (Note: SIP credentials will be in the browser source code)
-
Using Siperb Provisioning and using the Siperb Proxy -> Use our Web Phone SDK to:
- Login + fetch device provisioning, then initialize SIP.js/JsSIP/custom client from that provisioning. Select this option
- Login + fetch device provisioning, then initialize Browser Phone SDK client from that provisioning. Select this option (recommended option)
1. Manual credentials (no provisioning) and not using the Siperb Proxy
It is possible to use our Browser Phone SDK to create a fully operational WebRTC SIP phone, with direct registration to your own PBX. Note that the SIP credentials would then be hard-coded, or you would require your own provisioning solution to populate this information. Only if you use our provisioning system (and using the Access Token) could we help as a provisioning service.
Option A — Load Browser Phone SDK client
Note: this is a free option! You will not be using or consuming any of the Siperb features.
With this option you will skip any provisioning options provided by the Web Phone SDK. This will be up to you to add. Also, you cannot add details to connect to the Siperb Proxy, since only by using the provision service will the necessary details be provided. So using this option, you will be manually setting and connecting to your own PBX.
Note: your PBX Server SIP Authentication details will be visible to the browser source code.
You will need to load the Web Phone SDK. Make sure you get the latest version from the CDN, or use the release code from the GitHub Repo: https://github.com/Siperb/Web-Phone/releases
Add the UDM JavaScript SDK to your page in the Head or Body. The script can load at any time, and can be loaded as async :
Copied!<head> ... (Other Headers) <script src="https://cdn.siperb.com/lib/Siperb-Web-Phone/Web-Phone-<version_number>.umd.min.js"></script> </head> or <body> ... (site content) <script src="https://cdn.siperb.com/lib/Siperb-Web-Phone/Web-Phone-<version_number>.umd.min.js"></script> </body>
Note: This exposes the SDK via a browser/global window.Siperb namespace, but since the code could be loaded at any time (via async), you must wait for the page to load before you use the SDK. window.addEventListener('load', async () => { <use_the_sdk> })
The following objects are exported to the global namespace (window.Siperb) when the script loads. (If you are using ESM library, then these will become available to import).
Copied!/** * Load the Browser Phone into the IFRAME * @param {HTMLIFrameElement} The iframe element to load the phone into * @returns {Promise<Object>} - resolves when done, or rejects with error */ LoadBrowserPhone(iframeElement) /** * * @param {Object} options object with the following properties: * @param {Object} options.Provisioning - The provisioning object * @param {HTMLIFrameElement} options.PhoneFrame - The iframe element containing the phone * @param {string} options.ProfileUserId - The Profile User ID (Device ID) * @param {string} options.SessionId - The current session ID * @param {string} options.UserId - The current user ID * @param {function} [options.OnLoad] - Optional OnLoad callback function * @returns {Promise} - Resolves when the phone is provisioned, or rejects with an error */ ProvisionPhone(options)
Note: You have to execute LoadBrowserPhone() first, and you must await for the return before you can provision the phone.
Since you will not be using the provisioning service you need to provide you own provisioning object:
Copied!// You can add your own elements, but this is the minimum required. const custom_provisioning = { RegistrationMode : "Socket" // Required for this configuration profileName : "My Name", // This will display in the profile section of the UI SipWssServer : "www.provider.com", // Your servers address (must present a valid SSL certificate) SipUsername : "username". // Your PBX SIP username for AOR and for Digest Authentication SipPassword : "****", // Your PBX SIP password for Digest Authentication SipDomain : "localhost", // You must provide a domain, or use "localhost" ProfileUserName : "Caller ID", // This will display as the Caller ID text SipContact : "", // Either empty ("") or a static contact header user. SipWebsocketPort : 8080, // Your servers TLS/SSL Web Socket Port. SipServerPath : "/ws", // This is the path attribute of the WebSocket Server }
Note: Since it’s a requirement to capture the microphone (GetUserMedia) in a secure environment (HTTPS), it also a requirement to connect to your web socket as wss:// . This means that the server you are connecting to (SipWssServer), must be issuing a valid TLS/SSL certificate, that matches the name of the server, and issued by a recognized Certificate Authority.
The complete solution may look something like this:
Copied!// Place in Head <script src="https://cdn.siperb.com/lib/Siperb-Web-Phone/Web-Phone-<version_number>.umd.min.js"></script> // Sample IFRAME in DOM <iframe id="phoneFrame" style="width:400px; height:640px; border:1px solid #000000; border-radius:5px; overflow:hidden;" allow="microphone; autoplay" ></iframe> // Place in Head <script> const custom_provisioning = { RegistrationMode : "Socket", profileName : "My Name", SipWssServer : "www.provider.com", SipUsername : "username", SipPassword : "****", SipDomain : "localhost", ProfileUserName : "Caller ID", SipContact : "", SipWebsocketPort : 8080, SipServerPath : "/ws", } const main = async function() { const thePhoneFrame = document.getElementById("phoneFrame"); await window.Siperb.LoadBrowserPhone(thePhoneFrame); const phoneAPI = await window.Siperb.ProvisionPhone({ Provisioning : custom_provisioning, // Your provisioning object PhoneFrame : thePhoneFrame, // The HTMLIFrameElement object ProfileUserId : "<instance_id>", // Any string to identify this instance SessionId : "<session_id>", // Any string to identify this session UserId : "<user_id>", // Any string to identify this user // Optional Settings EnableAvatar : true, // Show user avatar/profile picture EnabledSettings : false, // Show settings button EnableDialPad : true, // Show dial pad button EnableDisplayCallDetailRecords : true, // Show call detail records button EnableCallTransfer : true, // Enable call transfer feature EnableCallHold : true, // Enable call hold feature EnableCallMute : true, // Enable call mute feature EnableCallRecording : true, // Enable call recording feature EnableDeviceSelector : true, // Enable media device selection // Settings normally in settings window EnableAutoAnswer : false, // Auto answer incoming calls EnableDoNotDisturb : false, // Do not disturb mode EnableCallWaiting : false, // Call waiting feature Language : 'auto', // e.g. 'en-US' etc. DisplayDateFormat : 'MMM DD, YYYY', // Moment JS date format DisplayTimeFormat : 'hh:mm A', // Moment JS date time format UiThemeStyle : 'light', // 'light', 'dark', or 'system' // Optional: Callback when the phone UI has loaded and is ready OnLoad : function(){ phoneAPI.Toast("Browser Phone UI has loaded and is ready."); } // Additional option go here... }); // Add/Edit callbacks on phoneAPI here. phoneAPI.InitTooltips(); // Apply the tool tips // Done console.log('✅ Browser Phone provisioned and running.'); } window.addEventListener('load', async function(){ await main() }); </script>
Run In Codepen: https://codepen.io/siperb/pen/myrOdap
2. Using Siperb Provisioning but not using the Siperb Proxy
The Siperb Provisioning service can be a powerful feature. It allows you or a manager to add server details, or even custom nodes to the provision JSON. The next two options cover how to use the Siperb Provisioning service but omit the Siperb Proxy, therefore, both of the following options will cover connecting to your own SIP PBX.
Option A — Login, Provision and load a custom client
With this option, the code will perform the login process with the Personal Access Token (PAT), then download the provisioning, and use that downloaded provisioning data for SIP credentials.
Note: your PBX Server SIP Authentication details will be visible to the browser source code.
You will need to load the Web Phone SDK. Make sure you get the latest version from the CDN, or use the release code from the GitHub Repo: https://github.com/Siperb/Web-Phone/releases
Add the UDM JavaScript SDK to your page in the Head or Body. The script can load at any time, and can be loaded as async :
Copied!<head> ... (Other Headers) <script src="https://cdn.siperb.com/lib/Siperb-Web-Phone/Web-Phone-<version_number>.umd.min.js"></script> </head> or <body> ... (site content) <script src="https://cdn.siperb.com/lib/Siperb-Web-Phone/Web-Phone-<version_number>.umd.min.js"></script> </body>
Note: This exposes the SDK via a browser/global window.Siperb namespace, but since the code could be loaded at any time (via async), you must wait for the page to load before you use the SDK. window.addEventListener('load', async () => { <use_the_sdk> })
The following objects are exported to the global namespace (window.Siperb) when the script loads. (If you are using ESM library, then these will become available to import).
Copied!/** * Login - fetches your session token using your access token. * @param {string} pat - Your Personal Access Token (PAT) generated from the Admin Control Panel * @returns {Promise<Object>} - resolves with session object */ Login(pat) /** * GetProvisioning - fetches provisioning data and sets window.Siperb.PROVISIONING * @param {Object} options - options for provisioning retrieval * @returns {Promise<Object>} - resolves with provisioning object */ GetProvisioning(options)
Note: You have to execute LoadBrowserPhone() first, and you must await for the return before you can provision the phone.
As you can see, the Login function requires the PAT. You will need to add/obtain this from the Siperb Admin Control Panel. Either as the logged in user, or as a Manager of a Domain Member. If you have not already, you should also create your Embedded Script Device.
Once logged in as an owner, go to:
Setting Window -> Admin Control Panel -> Developer Settings
Once logged in as an administrator, go to:
Setting Window -> Admin Control Panel -> Domain Users -> (select the user) -> Developer Settings (Tab)
Note: You should also get your device token at the same time. Keep both these codes in a safe place. Make sure you do not share it, email it around, or check this into code repositories. You will however have to use it in the code below.
Now that you have the PAT and the device token, you can use the result of the provisioning data to provision your own SIP client.
Copied!// Place in Head <script src="https://cdn.siperb.com/lib/Siperb-Web-Phone/Web-Phone-<version_number>.umd.min.js"></script> // Place in Head <script> const main = async function() { const accessToken = "<YOUR_PERSONAL_ACCESS_TOKEN>"; // Personal Access Token from ACP let session; try { session = await window.Siperb.Login(accessToken); } catch (error) { console.error('Failed to get session:', error); return; } const provisioning = await window.Siperb.GetProvisioning({ UserId: session.UserId, // Your user id returned from Login DeviceToken: "<YOUR_KNOWN_DEVICE_TOKEN>"; // Device Token from ACP SessionToken: session.SessionToken, // Your session token returned from Login EnableCache: true, // Turn caching on or off ProvisioningKey: "SIPERB_PROVISIONING". // Key used in localstorage }); // At this point you can build you own client, and simply use: console.log('✅ Provisioned complete, this is the data:', provisioning); // You can use SIP.js, SIPml or JsSip or even your own custom SIP stack // Simply pick out the values you need. Some useful ones are: // provisioning.SipWssServer // provisioning.SipWebsocketPort // provisioning.SipUsername // provisioning.SipPassword // JsSip: https://github.com/Siperb/Web-Phone/blob/main/test-JSSIP.html // SIPJS: https://github.com/Siperb/Web-Phone/blob/main/test-SIPJS.html // The provisioning system can provide any node or type string, bool or int. // There are custom provisioning fields that can add even more fields. } window.addEventListener('load', async function(){ await main() }); </script>
Option B — Login, Provision and load Browser Phone SDK
With this option, the code will perform the login process with the Personal Access Token (PAT), then download the provisioning, and use that downloaded provisioning data for SIP credentials. We will then apply these settings to the Browser Phone SDK, and have it connect to your own PBX.
Note: your PBX Server SIP Authentication details will be visible to the browser source code.
You will need to load the Web Phone SDK. Make sure you get the latest version from the CDN, or use the release code from the GitHub Repo: https://github.com/Siperb/Web-Phone/releases
Add the UDM JavaScript SDK to your page in the Head or Body. The script can load at any time, and can be loaded as async :
Copied!<head> ... (Other Headers) <script src="https://cdn.siperb.com/lib/Siperb-Web-Phone/Web-Phone-<version_number>.umd.min.js"></script> </head> or <body> ... (site content) <script src="https://cdn.siperb.com/lib/Siperb-Web-Phone/Web-Phone-<version_number>.umd.min.js"></script> </body>
Note: This exposes the SDK via a browser/global window.Siperb namespace, but since the code could be loaded at any time (via async), you must wait for the page to load before you use the SDK. window.addEventListener('load', async () => { <use_the_sdk> })
The following objects are exported to the global namespace (window.Siperb) when the script loads. (If you are using ESM library, then these will become available to import).
Copied!/** * Login - fetches your session token using your access token. * @param {string} pat - Your Personal Access Token (PAT) generated from the Admin Control Panel * @returns {Promise<Object>} - resolves with session object */ Login(pat) /** * GetProvisioning - fetches provisioning data and sets window.Siperb.PROVISIONING * @param {Object} options - options for provisioning retrieval * @returns {Promise<Object>} - resolves with provisioning object */ GetProvisioning(options) /** * Load the Browser Phone into the IFRAME * @param {HTMLIFrameElement} The iframe element to load the phone into * @returns {Promise<Object>} - resolves when done, or rejects with error */ LoadBrowserPhone(iframeElement) /** * * @param {Object} options object with the following properties: * @param {Object} options.Provisioning - The provisioning object * @param {HTMLIFrameElement} options.PhoneFrame - The iframe element containing the phone * @param {string} options.ProfileUserId - The Profile User ID (Device ID) * @param {string} options.SessionId - The current session ID * @param {string} options.UserId - The current user ID * @param {function} [options.OnLoad] - Optional OnLoad callback function * @returns {Promise} - Resolves when the phone is provisioned, or rejects with an error */ ProvisionPhone(options)
Note: You have to execute LoadBrowserPhone() first, and you must await for the return before you can provision the phone.
As you can see, the Login function requires the PAT. You will need to add/obtain this from the Siperb Admin Control Panel. Either as the logged in user, or as a Manager of a Domain Member. If you have not already, you should also create your Embedded Script Device.
Once logged in as an owner, go to:
Setting Window -> Admin Control Panel -> Developer Settings
Once logged in as an administrator, go to:
Setting Window -> Admin Control Panel -> Domain Users -> (select the user) -> Developer Settings (Tab)
Note: Since this option does not register with the Siperb proxy, and you will be using provisioning, you have to change the device registration mode to WebSocket.
You now need to change the device registration mode to “WebSocket”. This will mean that you can enter your own PBX Server details into the Admin Control Panel, and have these details provision to the Embedded Script Device. To do this you must log into the Admin Control Panel as an owner or as an administrator for another user, and change the Device Registration Mode.
Once logged in as an owner, go to:
Setting Window -> Admin Control Panel -> Developer Settings -> (select the embedded script device)
Once logged in as an administrator, go to:
Setting Window -> Admin Control Panel -> Domain Users -> (select the user) -> Developer Settings (Tab) -> (select the embedded script device)
At the bottom of this page, will be Registration Mode, by default the devices are created as “Proxy”. Change the selection to WebSocket. Once you have done this, you will see the server details, like address, username and password. You can complete these details here.
Note: You can only use the “Allow Self-Signed Certificate” when using the Siperb Desktop Application, and the server address entered is an IP address.
Now that the device has your own server details entered into the WebSocket details section, you can continue to build the Embedded Script Device in your Web Site, Saas Site or CRM. The following is an example of a complete solution:
Copied!// Place in Head <script src="https://cdn.siperb.com/lib/Siperb-Web-Phone/Web-Phone-<version_number>.umd.min.js"></script> // Sample IFRAME in DOM <iframe id="phoneFrame" style="width:400px; height:640px; border:1px solid #000000; border-radius:5px; overflow:hidden;" allow="microphone; autoplay" ></iframe> // Place in Head <script> const main = async function() { const accessToken = "<YOUR_PERSONAL_ACCESS_TOKEN>"; // Personal Access Token from ACP let session; try { session = await window.Siperb.Login(accessToken); } catch (error) { console.error('Failed to get session:', error); return; } const provisioning = await window.Siperb.GetProvisioning({ UserId: session.UserId, // Your user id returned from Login DeviceToken: "<YOUR_KNOWN_DEVICE_TOKEN>"; // Device Token from ACP SessionToken: session.SessionToken, // Your session token returned from Login EnableCache: true, // Turn caching on or off ProvisioningKey: "SIPERB_PROVISIONING". // Key used in localstorage }); const thePhoneFrame = document.getElementById("phoneFrame"); await window.Siperb.LoadBrowserPhone(thePhoneFrame); const phoneAPI = await window.Siperb.ProvisionPhone({ Provisioning : provisioning, // The returned provisioning object PhoneFrame : thePhoneFrame, // The HTMLIFrameElement object ProfileUserId : "<instance_id>", // Any string to identify this instance SessionId : "<session_id>", // Any string to identify this session UserId : "<user_id>", // Any string to identify this user // Optional Settings EnableAvatar : true, // Show user avatar/profile picture EnabledSettings : false, // Show settings button EnableDialPad : true, // Show dial pad button EnableDisplayCallDetailRecords : true, // Show call detail records button EnableCallTransfer : true, // Enable call transfer feature EnableCallHold : true, // Enable call hold feature EnableCallMute : true, // Enable call mute feature EnableCallRecording : true, // Enable call recording feature EnableDeviceSelector : true, // Enable media device selection // Settings normally in settings window EnableAutoAnswer : false, // Auto answer incoming calls EnableDoNotDisturb : false, // Do not disturb mode EnableCallWaiting : false, // Call waiting feature Language : 'auto', // e.g. 'en-US' etc. DisplayDateFormat : 'MMM DD, YYYY', // Moment JS date format DisplayTimeFormat : 'hh:mm A', // Moment JS date time format UiThemeStyle : 'light', // 'light', 'dark', or 'system' // Optional: Callback when the phone UI has loaded and is ready OnLoad : function(){ phoneAPI.Toast("Browser Phone UI has loaded and is ready."); } // Additional option go here... }); // Add/Edit callbacks on phoneAPI here. phoneAPI.InitTooltips(); // Apply the tool tips // Done console.log('✅ Browser Phone provisioned and running.'); } window.addEventListener('load', async function(){ await main() }); </script>
Run In Codepen: https://codepen.io/siperb/pen/VYKmvWK
3. Using Siperb Provisioning and the Siperb Proxy
With the 3rd option you will use all the options, and have the most secure solution. Your PBX credentials are securely stored, out of sight from your users or even the public – you use “Connections” to connect with any number of PBX services, or ISPs. The next two options cover using Siperb as a provisioning service, and as a secure proxy (no exposed passwords), but we can still offer two ways to make the actual phone client, either use your own custom code (with a few extra headers), or just use our entire solution.
Option A — Login, Provision, Use Proxy and load a custom client
With this option, you will use the Web Phone SDK to login, and provision your own custom phone client using something like SIP.js, JsSIP, SIPml or even your own SIP JavaScript.
Note: You will have to add a Connection to the proxy in order to route calls between the client and your PBX.
To add a connection to the proxy, you must login as either yourself or as an Administrator to a Domain User.
Once logged in as an owner, go to:
Setting Window -> Admin Control Panel -> Connections -> Add Connection
Once logged in as an administrator, go to:
Setting Window -> Admin Control Panel -> Domain Users -> (select the user) -> Connections (Tab) -> Add Connections
In the Add Connection window, select either Inbound Registration, Outbound Registration, or Outbound Trunk. You can read more about each type from the links. Each offers a slightly different technique to connect the Siperb Proxy with your PBX.
You will need to load the Web Phone SDK. Make sure you get the latest version from the CDN, or use the release code from the Github Repo: https://github.com/Siperb/Web-Phone/releases
Add the UDM JavaScript SDK to your page in the Head or Body. The script can load at any time, and can be loaded as async :
Copied!<head> ... (Other Headers) <script src="https://cdn.siperb.com/lib/Siperb-Web-Phone/Web-Phone-<version_number>.umd.min.js"></script> </head> or <body> ... (site content) <script src="https://cdn.siperb.com/lib/Siperb-Web-Phone/Web-Phone-<version_number>.umd.min.js"></script> </body>
Note: This exposes the SDK via a browser/global window.Siperb namespace, but since the code could be loaded at any time (via async), you must wait for the page to load before you use the SDK. window.addEventListener('load', async () => { <use_the_sdk> })
The following objects are exported to the global namespace (window.Siperb) when the script loads. (If you are using ESM library, then these will become available to import).
Copied!/** * Login - fetches your session token using your access token. * @param {string} pat - Your Personal Access Token (PAT) generated from the Admin Control Panel * @returns {Promise<Object>} - resolves with session object */ Login(pat) /** * GetProvisioning - fetches provisioning data and sets window.Siperb.PROVISIONING * @param {Object} options - options for provisioning retrieval * @returns {Promise<Object>} - resolves with provisioning object */ GetProvisioning(options)
Note: You have to execute LoadBrowserPhone() first, and you must await for the return before you can provision the phone.
Since you will be using your own phone client, you will need to perform a few additional steps to your own chosen SDK. The following example is for JsSIP, but the same principle will be applied for SIPJS or others.
Copied!// Place in Head <script src="https://cdn.siperb.com/lib/Siperb-Web-Phone/Web-Phone-<version_number>.umd.min.js"></script> // Place in Head <script> const main = async function() { const accessToken = "<YOUR_PERSONAL_ACCESS_TOKEN>"; // Personal Access Token from ACP let session; try { session = await window.Siperb.Login(accessToken); } catch (error) { console.error('Failed to get session:', error); return; } const prov = await window.Siperb.GetProvisioning({ UserId: session.UserId, // Your user id returned from Login DeviceToken: "<YOUR_KNOWN_DEVICE_TOKEN>"; // Device Token from ACP SessionToken: session.SessionToken, // Your session token returned from Login EnableCache: true, // Turn caching on or off ProvisioningKey: "SIPERB_PROVISIONING". // Key used in localstorage }); // Build WebSocket server URL const wsServer = `wss://${prov.SipWssServer}:${prov.SipWebsocketPort}/${prov.SipServerPath}`; // Example JsSIP configuration using provisioning details const socket = new window.JsSIP.WebSocketInterface(wsServer); const configuration = { sockets: [socket], uri: `sip:${prov.SipUsername}@${prov.SipDomain}`, password: provisioning.SipPassword, contact_uri: `sip:${prov.ContactUserName}@${provisioning.SipDomain}`, extra_headers: [ `X-Siperb-Sid: ${session.SessionToken}`, // Your Siperb Session token `X-Siperb-Uid: ${session.UserId}`, // Your Siperb User ID `Authorization: Bearer ${provisioning.SipJwt}` // Your Siperb JSON Web Token ] }; // Start JsSIP UserAgent const ua = new window.JsSIP.UA(configuration); ua.start(); console.log('JsSIP UA started.'); // Example: Make an outbound call with custom headers const target = 'sip:*65@${prov.SipWssServer}'; const eventHandlers = Array; const options = { extraHeaders: [ `X-Siperb-Sid: ${session.SessionToken}`, // Your Siperb Session token `X-Siperb-Uid: ${session.UserId}`, // Your Siperb User ID `Authorization: Bearer ${provisioning.SipJwt}` // Your Siperb JSON Web Token ] // ...other call options as needed }; ua.call(target, options); console.log('Outbound call initiated with custom headers.'); // End of demonstration } window.addEventListener('load', async function(){ await main() }); </script>
Option B — Login, Provision, Use Proxy and load Browser Phone SDK
With this option, you will use the Web Phone SDK to login, and provision the Browser Phone SDK, and have a complete secure operational SIP based phone embedded into your web page.
Note: You will have to add a Connection to the proxy in order to route call between the client and your PBX.
To add a connection to the proxy, you must login as either yourself or as an Administrator to a Domain User.
Once logged in as an owner, go to:
Setting Window -> Admin Control Panel -> Connections -> Add Connection
Once logged in as an administrator, go to:
Setting Window -> Admin Control Panel -> Domain Users -> (select the user) -> Connections (Tab) -> Add Connections
In the Add Connection window, select either Inbound Registration, Outbound Registration, or Outbound Trunk. You can read more about each type from the links. Each offers a slightly different technique to connect the Siperb Proxy with your PBX.
You will need to load the Web Phone SDK. Make sure you get the latest version from the CDN, or use the release code from the Github Repo: https://github.com/Siperb/Web-Phone/releases
Add the UDM JavaScript SDK to your page in the Head or Body. The script can load at any time, and can be loaded as async :
Copied!<head> ... (Other Headers) <script src="https://cdn.siperb.com/lib/Siperb-Web-Phone/Web-Phone-<version_number>.umd.min.js"></script> </head> or <body> ... (site content) <script src="https://cdn.siperb.com/lib/Siperb-Web-Phone/Web-Phone-<version_number>.umd.min.js"></script> </body>
Note: This exposes the SDK via a browser/global window.Siperb namespace, but since the code could be loaded at any time (via async), you must wait for the page to load before you use the SDK. window.addEventListener('load', async () => { <use_the_sdk> })
The following objects are exported to the global namespace (window.Siperb) when the script loads. (If you are using ESM library, then these will become available to import).
Copied!/** * Login - fetches your session token using your access token. * @param {string} pat - Your Personal Access Token (PAT) generated from the Admin Control Panel * @returns {Promise<Object>} - resolves with session object */ Login(pat) /** * GetProvisioning - fetches provisioning data and sets window.Siperb.PROVISIONING * @param {Object} options - options for provisioning retrieval * @returns {Promise<Object>} - resolves with provisioning object */ GetProvisioning(options) /** * Load the Browser Phone into the IFRAME * @param {HTMLIFrameElement} The iframe element to load the phone into * @returns {Promise<Object>} - resolves when done, or rejects with error */ LoadBrowserPhone(iframeElement) /** * * @param {Object} options object with the following properties: * @param {Object} options.Provisioning - The provisioning object * @param {HTMLIFrameElement} options.PhoneFrame - The iframe element containing the phone * @param {string} options.ProfileUserId - The Profile User ID (Device ID) * @param {string} options.SessionId - The current session ID * @param {string} options.UserId - The current user ID * @param {function} [options.OnLoad] - Optional OnLoad callback function * @returns {Promise} - Resolves when the phone is provisioned, or rejects with an error */ ProvisionPhone(options)
Note: You have to execute LoadBrowserPhone() first, and you must await for the return before you can provision the phone.
The complete code of this solution is as follows:
Copied!// Place in Head <script src="https://cdn.siperb.com/lib/Siperb-Web-Phone/Web-Phone-<version_number>.umd.min.js"></script> // Sample IFRAME in DOM <iframe id="phoneFrame" style="width:400px; height:640px; border:1px solid #000000; border-radius:5px; overflow:hidden;" allow="microphone; autoplay" ></iframe> // Place in Head <script> const main = async function() { const accessToken = "<YOUR_PERSONAL_ACCESS_TOKEN>"; // Personal Access Token from ACP let session; try { session = await window.Siperb.Login(accessToken); } catch (error) { console.error('Failed to get session:', error); return; } const provisioning = await window.Siperb.GetProvisioning({ UserId: session.UserId, // Your user id returned from Login DeviceToken: "<YOUR_KNOWN_DEVICE_TOKEN>"; // Device Token from ACP SessionToken: session.SessionToken, // Your session token returned from Login EnableCache: true, // Turn caching on or off ProvisioningKey: "SIPERB_PROVISIONING". // Key used in localstorage }); const thePhoneFrame = document.getElementById("phoneFrame"); await window.Siperb.LoadBrowserPhone(thePhoneFrame); const phoneAPI = await window.Siperb.ProvisionPhone({ Provisioning : provisioning, // The returned provisioning object PhoneFrame : thePhoneFrame, // The HTMLIFrameElement object ProfileUserId : "<instance_id>", // Any string to identify this instance SessionId : "<session_id>", // Any string to identify this session UserId : "<user_id>", // Any string to identify this user // Optional Settings EnableAvatar : true, // Show user avatar/profile picture EnabledSettings : false, // Show settings button EnableDialPad : true, // Show dial pad button EnableDisplayCallDetailRecords : true, // Show call detail records button EnableCallTransfer : true, // Enable call transfer feature EnableCallHold : true, // Enable call hold feature EnableCallMute : true, // Enable call mute feature EnableCallRecording : true, // Enable call recording feature EnableDeviceSelector : true, // Enable media device selection // Settings normally in settings window EnableAutoAnswer : false, // Auto answer incoming calls EnableDoNotDisturb : false, // Do not disturb mode EnableCallWaiting : false, // Call waiting feature Language : 'auto', // e.g. 'en-US' etc. DisplayDateFormat : 'MMM DD, YYYY', // Moment JS date format DisplayTimeFormat : 'hh:mm A', // Moment JS date time format UiThemeStyle : 'light', // 'light', 'dark', or 'system' // Optional: Callback when the phone UI has loaded and is ready OnLoad : function(){ phoneAPI.Toast("Browser Phone UI has loaded and is ready."); } // Additional option go here... }); // Add/Edit callbacks on phoneAPI here. phoneAPI.InitTooltips(); // Apply the tool tips // Done console.log('✅ Browser Phone provisioned and running.'); } window.addEventListener('load', async function(){ await main() }); </script>